Endplate stack assembly procedure


The mechanical drawings are here. Relevant drawing numbers are 029-091. Major components are described in order of stacking:

I. Prepare the endplate:
   The mechanical drawings are here
  1. Inner D-ring to endplate sheet (r.h.s. of the jig):
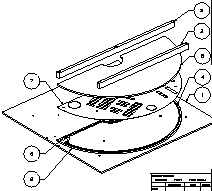
    1. Put the assembly jig up on some 2x blocks.
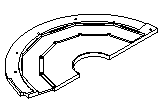
    2. File a notch in the inner D ring. Check the orientation by placing the D-ring on the jig. The O-ring notch should be down for both MVD3 and MVD4-type endplates. Place the sheet on the jig. The pattern drawn on the jig in black makes an MVD3-type endplate, and green makes an MVD-4 type. The notch should be filed on the side of the power connectors. Drawing here.
    3. Clean the glue surfaces with alcohol to remove grease.
    4. Place the D-ring on the jig. Check orientation.
    5. Prepare the glue: Epotek silver epoxy, kept in the chemical safe in the tent. Mix 10:1 by weight. For the 2 D-rings, 4g should enough.
    6. Glue the pieces together. This side has a pair of alignment pins. Place the top pressure plate and bars, and add a few small clamps in the 3 o'clock region.
    7. Put the whole assembly into the oven, up on 2x blocks to keep it clear from the bottom and sides. Cure 2h at 85C.
    8. Trim protruding sheet with file or scalpel.
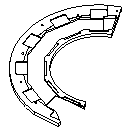
  2. Outer D-ring to endplate sheet (l.h.s. of the jig):
    1. Clean the glue surfaces with alcohol to remove grease. Check the orientation of the sheet. The pattern drawn on the jig in black makes an MVD3-type endplate, green for MVD-4.
    2. File a smaller notch corresponding to the one in the inner D-ring. This one only has to be 1mm deep. Check the orientation: The O-ring notch should be up for both the MVD3 and MVD4-type endplates.
    3. Place the D-ring on the jig. The O-ring notch should be up (down) to make an MVD3 (MVD4)-type endplate.
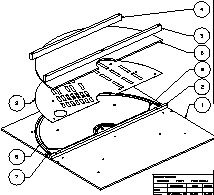
    4. Screw the 5 little tabs to the perimeter of the D-ring, and put fresh teflon tape along the center bar. These will hold the sheet in place, and prevent gluing to the center bar.
    5. Prepare the glue, same as before. Mix 10:1 by weight, 4g should enough.
    6. Glue the pieces together: Place the top pressure plate and bars, and add a few small clamps in the 9 o'clock region.
    7. Put the whole assembly into the oven, up on 2x blocks to keep it clear from the bottom and sides. Cure 2h at 85C.
    8. Trim protruding sheet with file or scalpel.
 
  1. Put the inner and outer assemblies together:
    1. This is done on the l.h.s. of the jig. Try the alignment: place the outer ass'y down, and lay the inner ass'y on top. Two alignment pins hold the inner ass'y in place. There are 3 small blocks on the bottom plate to fix the position of the outer ass'y such that all holes line up.
    2. Prepare the glue and glue the pieces together.
    3. place pink foam semicircle on the inside; loosen the bottom plate from the r.h.s. and place it on the foam.
    4. Tape pink foam on the D-ring and place the upped pressure plate on the whole stack.
    5. screw down bars (with longer screws and add clamps to the 9 o'clock position.
    6. cure in the oven, 2h at 85C.
  2. Cut extra holes, notches etc.:
    1. Use a nibbler to cut notches for ejector handles on the signal cable connectors.
    2. Drill 6 holes around the perimeter. Use paper template for positions.
    3. Cut rectangular hole for jumper block. Use drill, dremel tool, scalpel.
    4. cut relief in inner D-ring for a capacitor.
  3. Glue on the cuff and wings:
    1. xxx
    2. xxx
    3. xxx
II. Prepare the Mother Board
  1. Glue on the cooling tube. This is described on a separate page
  2. Make and glue on 6 threaded spacers.
    1. Make some 0.264" plexi (rough on bandsaw, on endmill?)
    2. Drill and tap holes for 8-32 screws. Then cut them apart, roughly round them with a file, and by putting them into the drill press, and sanding with a dremel tool. Fine-tune the thickness. Diameter should be about 3/4".
    3. Lay the mother board on the large paper template, and use the flaps to mark the 6 positions.
    4. Trim the spacers so they clear the D-ring, connector, etc.
    5. Glue them on with 5-min epoxy.
  3. Make the air barriers around the power connectors.
  4. Make the air barries around the signal connectors.
  5. Glue on the thin and thick plexi spacer rings.
    There are 2 each. The thin ones (0.264") go on the endplate side, the thick ones on the daughter board side. Use 5-min epoxy.
  6. Check the paths of the added power wires. They should lay side-by side.

III. Prepare the lower foam piece
  1. On the tube side, do some milling. There are 3 separate templates:
    1. A template for the location of the fuses (paper).
    2. a template for the signal connectors (paper); milled out only 1mm or so.
    3. a template for solder bumps (mylar). Use Dremel tool with drill bit for this.
    4. In addition, mill out long grooves for the power connector pins, rows of nylon nuts, and some edges of the tube. (no template)
  2. Glue a mylar reinforcement in the pad plenum, over the thin part. There is a template, plus Rohacell pressure blocks. Use Araldite.
  3. Mill out on the daughter board side. There are some components on the daughter board that stick out. There is a template labeled 'MVD5 back side'.
  4. Square the corners where the mcm sits.

  1. Prepare the daughter board
    Extra power wires should be in place.

V. Prepare the plenum cover piece
  1. Mill out spaces for the daughter board components. Template named 'MVD5'
  2. Make the 5-mil Al cover spacer. There is a template.
  3. Put together the xxx

VI. Finally, build the stack


Last update 20 Aug 2002 - HvH & MJB