LDO cooling tube mounting procedure
There are left-handed and right-handed versions of the endplate/motherboard
assemblies, named MVD-3 and MVD-4. I will describe only one of them. The
cooling tubes are mounted onto fully populated mother boards. They are glued
to the board with epoxy which is thermally conducting, electrically insulating
and flexible. The placement of the tube on the motherboard can be as bad as
0.5-1.0 mm, but the location of the protruding pieces must be more precise,
since they have to fit through holes on the aluminum endplates.
|
The mechanical drawings
are here. Relevant drawing numbers are 46-57.
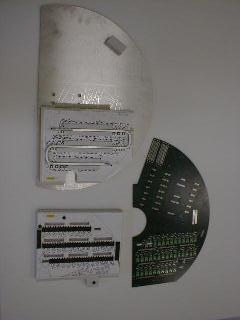
- Find the bottom support jig. It is the semicircular aluminum plate with the
foam support block glued onto it. The jigs are labeled MVD-3 and MVD-4.
Replace the strips of double-sided sticky foam tape. Also replace the black
foam tape on the top part of the jig with fresh material.
|
- Fit the cooling tube in the slot formed by the foam blocks.
Check the fit using an (unpopulated, if available)
mother board, and also the thin aluminum endplate.
They should fit over the two ends of the tube that are sticking up.
The tubes are made of soft aluminum, and small adustments can be made.
Use the aluminum rod that fits over the tube ends.
Sand the glue-side surface of the tube, using a flat block and paper.
- Surgery on the Mother board:
On MVD-4 boards, the tube runs right over
one of the fuses. Remove the fuse, and place it further in. Reconnect with
wires. Cut one of the traces. Cover exposed contacts with kapton tape so they
don't short to the cooling tube.
The nylon nust are sitting on one turn of thread or less. Take off the nuts,
remove the washers and put the nuts back on. Retighten such that the nuts have
a flat side lined up with the cooling tube.
Leave off the nuts and screws on the 'inside turns' of the tube, where they
might be in the way.
|
- Mix the epoxy. This is the Melcor TC 004, in the small
white containers with white and black tops. Each pair of containers is enough
to mix 2 batches. Measure out the glue on the electronic scale. 2.50g each.
- Apply the epoxy to the tube. Since the glue cures at 85°C, you have
plenty of time. The glue has the consistency of very dry peanut butter. You
can start with a spatula or scalpel, but in the end you can use a finger to
spread it evenly.
- Place the tube on the bottom jig.
- Fit the mother board over the alignment pins and the tube ends.
- Fit the foam pressure block over the alignment pins
- Place the clamping block (short piece of 2x6) on the yellow hatched area
and tighten it down with 4 nuts.
- Turn the whole thing upside down, so that the board side of the glue
joint is down. Curing time is 1 hour at 85°C.
- Reinforce the tube ends by sewing on a button. Fix the thread with a
dab of 5-min epoxy.
Footnotes:
The epoxies we considered were:
        name                 thermal cond.   tensile str.
                         Btu/ft/hr/F/in       psi at 25C
Ther-o-bond 200000            3.47              2360
ther-o-bond 15990             9                 9800       black
            161000            6.1               8400       blue
magnobond   6375                                3871
            8006                                1303       conductive
melcor tce 02/3               12                1000
       tce 004                25                1000       high mismatch
The Melcor 004 was chosen because it is specifically made for cooling
applications in the electronics industry: high thermal conductivity, low
electrical conductivity, and mechanical flexibility for use with materials
with large thermal expansion coefficient mismatches.
Last update 5 Mar 2001 - HvH
back