Heat exchanger box assembly procedure


A drawing is here.

  1. Prepare the box:
    1. Drill 4 holes in the top for 10-24 rod
    2. Cut big hole in the bottom. If using saber saw, support the sheet well, or the welds on the box will shake loose. Alternative: use dremel tool.
    3. Fit the extender box. Drill about 18 holes for self-tapping screws, mount the extender box, and remove it again for now
    4. Cover up unused holes, move drain hole.
    5. Put in 5 sides of foam. Cut 0.25" relief pattern for copper tubes, using the paper template. Cut holes and small funnel shape for drain pan.
    6. Put in the lexan air hose output adapters

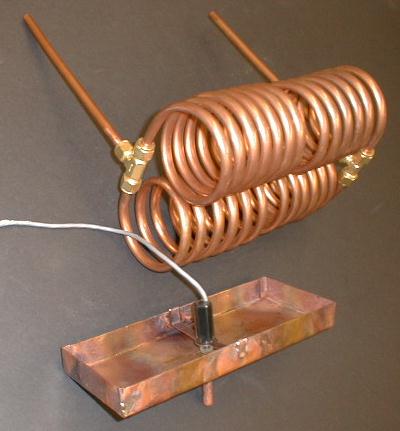
  2. Assemble and mount drip pan:
    1. The finished pan is 3.75×10×1" copper sheet; cut extra 0.25" tabs for lap joint at the corners
    2. Braze the four joints - test for leaks
    3. Hammer a profile in the bottom using the carved 2x10 block
    4. Drill a hole in the center, and use a countersink bit to hammer a funnel shape; drill out to just under 3/8"
    5. Use countersink to shape the end of a 3-4" piece of 3/8 copper tubing, hammer into hole
    6. Braze drain tube in place
    7. Make a bridge for the level sensor. Strip of copper, 1/4" pipe thread tap. Folds to go over drip pan edge.
    8. Braze into place, screw sensor into tapped hole.
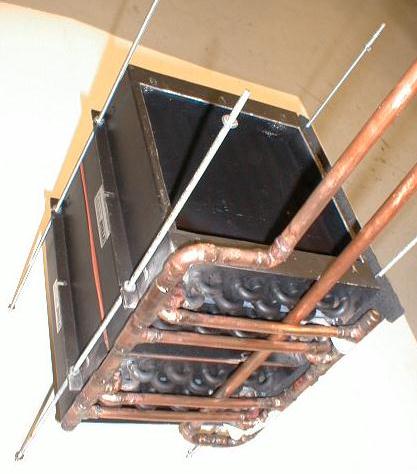
    9. Put drip pan assembly into the box, thread signal cable out.

  3. Assemble and mount coils:
    1. trim coil ends and assemble coils and straight pieces with swagelock (1.25 turns) so that coils fit closely alongside each other.
    2. space loops in the bottom coil such that there is space in the center for the level sensor
    3. slide coils into the box
    4. slip on the mounting adapters, screw into place

  1. Assemble and mount the radiator stack:
    1. enlarge the round hole in the radiator face to a large rectangle, leaving only about 1/4" edge
    2. make 2 rubber gaskets (axb outside, cxd inside hole, 6 small holes)
    3. stack up 4 radiators, alternating right side up and upside down, gaskets in between the center two, using 4 10-24 threaded rods.
    4. build up manifolds and braze
    5. test for leaks, and fix holes in aluminum walls with scraps and RTV.
    6. Fill in the outside side face with 1/2" foam
    7. make a foam piece to block airflow along the back. This is a 1" piece across the center , molded around the tubes
    8. make a foam piece to block flow along the inside side face. About 3/4" thick
    9. Put the inside top nuts in the right place on the rods (9.5" from the center plane where the gaskets are), hold in place with small bit of masking tape.
    10. (With everything upside down), slide the stack into the box, and get the rods through the holes in the top box surface, put on top outside nuts.

  2. Assemble and mount extender box:
    1. cut the cover plate (drawing here)
    2. mount extender box, using liquid gasket goop to ensure airtight seal
    3. Cut and install insulating foam, and check for air leak paths along all four sides of the radiator stack
    4. put foam on lid, install lid, using liquid gasket goop

  3. Finish up:
    1. Close up the main box, with foam.
    2. Trim tubes and mount swagelock connectors.
    3. Pressurize box and fix any leaks


Last update 21 Jan 2000 - HvH
back