Gluing Procedure for MCM to MCM Output Cable
Toshiyuki Shiina
The University of Alabama in Huntsville
September 22, 1999
Materials Needed
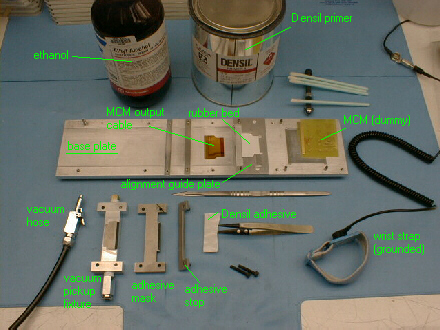
- Components
- Jig Parts
- Base Plate
- Correct Vacuum Pickup Fixture ("H-shaped")
- Adhesive Stop
- Correct Adhesive Mask
- Adhesive
- Densil Adhesive
- Densil Primer IV
- Miscellaneous
- Ethyl Alcohol
- Lint-Free Swabs
- Latex Gloves
- Scalpel with Fresh Blade
- Plastic tipped tweezers
- Wrist Strap (grounded)
- ESD safe rubber mat
Procedure
- Ensure that the ESD safe rubber mat on the fan bench and the wrist strap
are properly grounded to protect MCM's from ESD.
- Ensure the vacuum pump is turned on. If needed, turn on vacuum pump by plugging
it into outlet box on the floor next to the
lower left hand area of the fan bench.
- Turn on fan on fan bench.
- Cut off both edges of the output cable on the wider end with a scalpel
so that the edge fit into the opening of the kapton cover lay of the MCM. How much
has to be trimmed off may depend on the MCM since the kapton cover lay opening may vary.
- The gluing will occur on the wider end of the MCM output cable.
Using a lint-free swab and ethyl alcohol, clean both the top
and bottom of this end of the cable.
- Remove the Densil Primer IV from the chemical locker on top
of the fan bench. Gently swirl the can of primer to mix the contents.
Dip a lint-free swab into the primer, and apply a thin layer of primer to
the back side (opposite of the wirebonding trace side) of the output cable.
Allow this to dry completely; this should take around 2 minutes or less.
- Lay the cable on the rubber bed in the alignment guide plate with the wirebonding pads
up and the edges flush against the alignment plate.
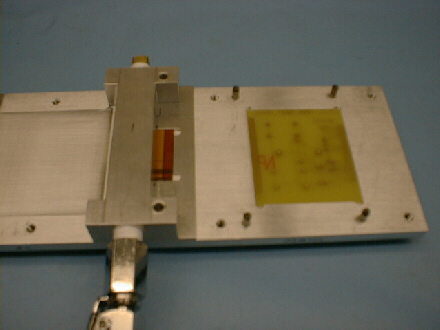
- Place the pickup fixture over the output cable using the registration pins,
and connect the vacuum hose.
- Cut a small piece (roughly 1/2" by 3") of Densil adhesive from the roll
using a scalpel with a fresh blade.
- Lay the adhesive piece on the table, with the protective sheet against
the table. Using the edge of the adhesive mask as a guide, cut a straight edge to the adhesive
using a sharp scalpel. Warning--if one is not careful or uses a dull scalpel blade,
it is very easy to crinkle up the adhesive, which makes it unusable for our purposes.
Ensure the adhesive is not crinkled up.
-
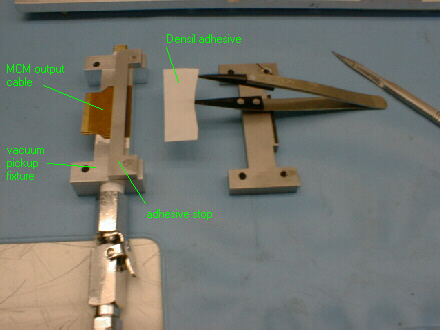 Place the adhesive stop onto the pickup fixture, using the registration pins.
Using the tweezers, apply the adhesive to the cable, with the protective sheet on the top
and the adhesive side contacting the cable. Use the adhesive stop to locate the straight edge
you cut in the previous step. When it is properly placed, run the rounded end of the tweezers
over the protective sheet to ensure good contact to the cable. Remove the adhesive stop from
the pickup fixture.
Place the adhesive stop onto the pickup fixture, using the registration pins.
Using the tweezers, apply the adhesive to the cable, with the protective sheet on the top
and the adhesive side contacting the cable. Use the adhesive stop to locate the straight edge
you cut in the previous step. When it is properly placed, run the rounded end of the tweezers
over the protective sheet to ensure good contact to the cable. Remove the adhesive stop from
the pickup fixture.
- With the adhesive mask as a guide, trim away the excess adhesive
using a sharp scalpel. Remove the adhesive mask.
- Place the adhesive stop back over the cable. Hold the stop down with
your finger; this will serve to help hold the cable in place as the gluer removes
the protective sheet from the adhesive. Using a scalpel, lift up one end of the protective sheet.
Note that it is easy to get only part of the protective sheet--be sure the adhesive
appears clear in the area where the sheet is lifted up. When an end of the protective
sheet is pulled up, grab it with the tweezers, and gently pull it the rest of the way off.
Remove the adhesive stop.
- Dip a lint-free swab into the Densil Primer, and apply a thin coat of primer
to the bonding pads of the MCM (50 traces with 0.5mm pitch). Allow the primer to dry thoroughly
(about 2 minutes or less). Return the primer to the chemical locker on top of the fan bench.
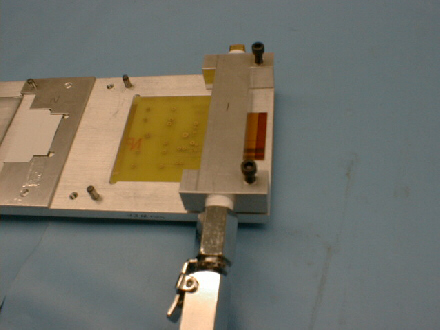
- Using the registration pins to align, place the pickup fixture and cable
on the glue jig base plate, wirebonding pads up. This should allow the adhesive to
contact MCM. Using two 8-32 x 3/4" screws, tighten down the pickup fixture,
which will allow for a pressure cure of the adhesive. After the fixture is screwed down,
the vacuum can be disconnected. Allow the adhesive to pressure cure for a minimum of 2 hours.
- Package assembly for shipping to wirebonder.